
Inspiration & How-To Guides for Rhinestone Crafts, Apparel & DIY Projects
Planet Rhinestone Blog

How To Bedazzle Anything: Your DIY Sparkle Guide
Does your pet’s collar need a bit of sparkle? Are you looking for a way to spice up your dance costume or bachelorette outfit? For a fun, jeweled look, you can’t do better than bedazzled rhinestones. With some preparation and a few pro tips, you can add bling to T-shirts, phone cases, posters, and more! Learn how to bedazzle with these beginner steps and get started on the right project for you.
Table of Contents
Essential Tools and Materials for Bedazzling Success
What Can You Bedazzle? (Almost Everything!)
Step-by-Step Bedazzling Techniques for Beginners
Pro Tips for Professional-Looking Results
Fun Bedazzling Project Ideas for Every Skill Level
Essential Tools and Materials for Bedazzling Success
Welcome to the creative world of bedazzling. These are the tools and materials you need to get started.
1. Rhinestones
There are all types of rhinestones. The exact sizes, colors, and finishes you need will depend on your project. Picking the right rhinestone is the most important decision, and these are the various gems and beads you can pick from:
Sew-on Rhinestones: These faceted stones have a flat back and small holes along the edges. You can attach them in two ways: stitching for maximum security or gluing for speed.
Flatback Rhinestones: These don’t have stitching holes, so you attach them with adhesive. Many are foiled on the bottom, which helps bounce light back up through the facets for a brighter look.
Pointed-back Rhinestones: These are faceted on the top and along the base, which helps light reflect through the stone. You can’t glue these onto a flat surface — they need a cup setting or a frame to hold them in place.
Hotfix Rhinestones: These have a raised backing with heat-activated adhesive. When heated with a press, wand, or mini iron, the glue melts and bonds especially well to fabrics.
Jelly Rhinestones: These plastic-like resin stones are lightweight, affordable, and popular for crafts like phone cases and nail art.
2. Adhesive Options
One of the biggest beginner mistakes in bedazzling isn’t placement. It’s using the wrong adhesive. If your rhinestones fall off, it’s almost always because the glue or application method didn’t match the material.
We’ll cover attachment methods later on. For now, you need to select the right adhesion product for your rhinestones:
Hotfix application: Since hotfix rhinestones already have glue built into their backing, you activate the glue using heat. The applicator tool heats the stone and melts the adhesive, which then bonds to the material as it cools.
Glue application: Standard craft glue dries clear and is easier to control than heavy industrial glues.
E6000 multi-purpose glue application: E6000 is a “heavy-duty” rhinestone adhesive. If you see professional rhinestone tumblers or performance costumes, this is often what was used.
3. Applicator Tools
Small stones are difficult to handle with just your fingers; using the right applicator tool makes your work faster and far less frustrating. If you’re working with hotfix rhinestones, you’ll need a handheld hotfix applicator tool. Otherwise, you can use a gem picker or tweezers.
A gem picker is basically a specialized wax pencil. It’s the most common tool beginners use since it’s so easy to handle. The wax tip lightly grips the rhinestone so you can lift and position it accurately without dropping it into the glue.
Tweezers are useful for larger stones and make it easy to gently reposition them before the adhesive sets. Many crafters keep both a wax pencil and tweezers nearby and switch between them as needed.
As you assemble your tools, grab some toothpicks, which are useful for making precise glue dots, and a small tray to keep your rhinestones from rolling away.
4. Design Templates
You can bedazzle freehand, but beginners usually get better results when they plan the design before placing the first stone. To map out your design, you can use:
Transfer tape: You can arrange rhinestones on the tape first, then move the entire design onto your project at once.
Stencils: Trace or lightly mark the shape on your final surface, then place stones along the guide.
Freehand sketching: Draw your pattern onto the item with a washable marker or pencil. Make sure not to use a permanent marker.
What Can You Bedazzle? (Almost Everything!)
You can bedazzle pretty much anything. If a surface can safely hold adhesive or accept stitching or heat, you can usually decorate it with rhinestones. Here are some of the most common categories to get your sparkly ideas flowing:
Clothing and accessories: T-shirts, jeans, shoes, hats, bags, and jewelry
Phone cases and tech accessories: Custom personalized devices
Pet accessories: Collars, leashes, and special outfits
Home decor: Picture frames, vases, mirrors, and decorative accents
Costumes: Dance competition outfits, Halloween costumes, and cheer gear
Party and event items: Centerpieces, signage, favors, and celebration decor
Step-by-Step Bedazzling Techniques for Beginners
Gather all your tools and materials in a ventilated area. You’re about to be working with a lot of glue, and it’s best to avoid breathing in the fumes. Most importantly, you need to buy enough rhinestones to finish your first project.
Determining how many crystals you need requires a bit of math. Measure the area you’re bedazzling, and divide that area by the size of the stones you chose. Always buy more rhinestones than you think you’ll need. This will save you from making a last-minute trip to the craft store for more rhinestones.
Bedazzling takes longer than people expect, and you don’t want to rush your first project. Work while watching TV, listening to music, or doing some other leisure activity. Most people finish projects over several days.
Different crystal sizes may take longer to bedazzle with. For example, it will take much longer to bedazzle a standard phone case with small SS6 than with larger SS30.
Now, it’s time to bedazzle! Follow these steps for a seamless first bedazzling experience.
Step 1: Prepare Your Surface
The right preparation determines whether your rhinestones stay on or fall off.
Clean the object with rubbing alcohol.
Let it fully dry.
Lightly sand smooth plastic or glossy surfaces.
If the base color differs from the stones, you can paint or color the surface to match the right color of your rhinestones so any tiny gaps blend in and look intentional.
Step 2: Plan Your Design
Before glue touches anything, decide on a color scheme and design. Choose a pattern like solid color coverage, stripes, ombré, shapes, or random, and sketch your layout with a pencil or a washable marker.
If you’re doing full coverage, like for a phone case, no drawing is required, since you’ll work in rows.
Step 3: Apply the Glue
Place a tiny dot of glue directly onto the item using a toothpick.
Place the rhinestone onto the glue.
Focus on placing every single crystal carefully rather than rushing, since precise placement early prevents crooked rows later.
Try to work in small sections, about 0.5 inch to 1 inch at a time, and wait one to two minutes for the glue to become slightly tacky before placing the stone.
Step 4: Place the Rhinestones
Now the actual bedazzling begins. You are essentially building a brick pattern.
Start in an area you won’t need to hold (toe of shoe, edge of phone case, corner of object).
Place stones side-by-side in a row.
Create a second row tucked into the gaps of the first row, forming a clean pattern where each row beneath the previous one sits slightly offset like bricks.
Continue downward.
Step 5: Fill the Gaps
Curves cause spaces, no matter what you do. Use smaller rhinestones to fill triangular gaps and cover edges. You can expect to use about ¼ to ⅓ as many small stones as large stones.
Step 6: Let It Dry Properly
This step determines durability. Do not touch your bedazzled item for 24 hours for E6000, and always avoid moisture while curing. You also can’t wear or use the bedazzled object for at least 48 hours after application.
After drying in a well-ventilated area, gently press the stones to confirm adhesion.
Pro Tips for Professional-Looking Results
Bedazzling is simple to learn, but what separates a beginner piece from a professional-looking piece is technique. Small adjustments make a huge difference.
Work in small sections: Apply adhesive to only a tiny area at a time. Small sections prevent sliding and let you focus on precise placement rather than rushing.
Keep spacing consistent: Straight rows create the clean, “store-bought” look people associate with professional work. Periodically step back and look at your project from a distance to see if your alignment is off.
Layer different sizes and colors: Professional designs rarely use a single stone size. You can also blend two shades of the same color or add a few contrasting accent stones to create dimension.
Seal your finished project: After the adhesive has fully cured, a light coat of clear acrylic spray sealant can help protect your work.
Buy from one manufacturer: Even stones labeled the same color can vary slightly between brands or production batches. Purchasing all rhinestones at once and from the same manufacturer keeps the sparkle uniform and the design cohesive.
Fun Bedazzling Project Ideas for Every Skill Level
You don’t need to jump straight into covering an entire jacket or pair of heels. Starting with small projects helps you learn how to work with your glue and how long placement actually takes. As your confidence improves, you can move into more detailed designs.
Beginners: Simple phone case designs, headband embellishments, or name monograms
Intermediate: Custom sneakers or cowboy boots, denim jacket designs, or picture frame borders
Advanced: Full garment coverage, intricate patterns, or large event decorations
Kids’ projects: School supplies, hair accessories, or personalized backpack tags
The best rule of thumb is that beginner projects should be small and flat. These projects teach basic placement and how much adhesive to use without overwhelming you. A phone case is especially popular because the surface is predictable and you can complete it in one or two sessions.
The most advanced projects require patience and a lot of planning. You’ll also likely need large quantities of rhinestones. Covering an entire garment or creating a detailed design involves mapping patterns and working in sections over multiple days.
Learn How To Bedazzle With Planet Rhinestone
When you choose the right color and build each row beneath the last, your finished piece will look balanced and professional. Start with a small project, follow the steps in this guide, and you’ll quickly transform everyday items into eye-catching custom pieces.
Ready, set, bedazzle! Gather your supplies and explore Planet Rhinestone’s selection of stones, adhesives, and tools to create your first sparkling project today.
FAQs
Can bedazzled items be washed?
Yes, if you use a proper adhesive. To wash a bedazzled item, turn the item inside out, wash on a gentle cycle, and air dry. Hotfix applications typically withstand washing better than glue. For best results, avoid hot water and harsh detergents, which can weaken the bond and dull the stones’ shine.
How do I remove rhinestones if I make a mistake?
Heat the adhesive with a hairdryer to soften the glue, then gently lift the stone with tweezers and work quickly before the adhesive re-hardens. After removal, clean away leftover residue before placing a new stone so the replacement sits flat and secure. Try to catch the mistake early before the glue really sets in.
Do rhinestones fall off over time?
Proper surface prep and quality adhesive ensure longevity; most bedazzled projects last years with normal use and care.
Where can I buy quality rhinestones and supplies?
Planet Rhinestone offers professional-grade glass rhinestones, adhesives, and tools suitable for DIY crafters at all experience levels. Keep in mind that purchasing from a consistent supplier also helps ensure color matching and uniform sparkle across your entire project.
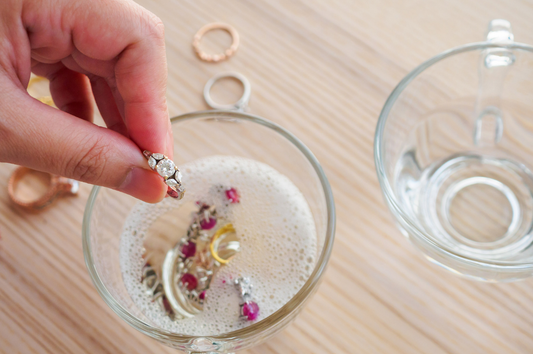
How to Clean Rhinestone Jewelry: A Step-By-Step Guide
We've all been there: that once-sparkling rhinestone jewelry now looks dull and lackluster. Maybe it's a cherished heirloom or a favorite piece that's lost its shine. The good news? It doesn't have to stay that way. Knowing how to clean rhinestone jewelry brings it back its original brilliance, so it looks as stunning as the day you first bought it.
Dive into this step-by-step guide to discover how to clean your rhinestone jewelry.
Why Regular Cleaning is Essential for Rhinestone Jewelry
Here's why regular cleaning is non-negotiable.
Longevity
Regular cleaning not only maintains the beauty of your rhinestone jewelry but also extends its lifespan. Dirt and oils from the skin can accumulate on the stones (especially when used in nail designs), causing them to lose their sparkle over time.
Aesthetic Appeal
A clean piece of rhinestone jewelry is more visually appealing. Regular cleaning ensures that the stones retain their brilliance and continue to catch the eye.
Hygiene
Jewelry comes in direct contact with your skin or nails, so keeping it clean helps to prevent skin irritations and allergies.
What You'll Need to Clean Rhinestone Jewelry
The right tools and solutions can make the cleaning process smooth and effective. Here are the materials and equipment you’ll need to gather before cleaning:
Cleaning Solutions
Mild Detergent
Specialized Jewelry Cleaner
Baking Soda
Glass Cleaner
Distilled Water
Tools
Soft-Bristle Brush
Lint-Free Cloth
Toothpick
Magnifying Glass
Small Bowl
Tweezers
Safety Gear
Gloves
Safety Goggles
Apron
Pre-Cleaning Steps
Before diving into the cleaning process, it's crucial to prepare your rhinestone jewelry and your workspace. Proper preparation ensures a safe and effective cleaning session. Here's how to get started:
Inspection
Check for Loose Stones: Gently shake the piece to listen for any rattling, indicating a loose stone.
Examine the Setting: Ensure that the metal holding the rhinestones is intact and not bent or broken.
Identify Foil-Backed Rhinestones: These require extra care as moisture can damage the foil backing.
Sorting
Separate by Type: Group your rhinestone jewelry by type, separating foil-backed from open-backed pieces.
Material Consideration: If your jewelry combines rhinestones with other materials like pearls or fabric, note that these materials need different cleaning methods.
Preparing the Work Area
Choose a Suitable Surface: Lay down a soft cloth or towel on a flat surface. This protects the jewelry and provides a good backdrop to spot any stones that might fall out.
Gather Supplies: Have all your cleaning solutions, tools, and safety gear within arm's reach.
Lighting: Ensure the area is well-lit, so you can see all the details of your jewelry, making the cleaning process more thorough.
Step-by-Step Guide to Cleaning Rhinestone Jewelry
Cleaning your rhinestone jewelry isn’t as daunting as it seems. Follow these steps for a hassle-free experience:
1. Dry Cleaning Method
Brush Gently: Using a soft-bristle brush, gently brush away any surface dirt or dust from the rhinestones.
Wipe Down: With a lint-free cloth, gently wipe the entire piece to remove any remaining dust.
2. Wet Cleaning Method
Prepare a Solution: Mix a few drops of mild detergent with lukewarm water in a small bowl.
Dip the Brush: Dip your soft-bristle brush into the solution and gently brush the rhinestones.
Rinse: If your rhinestones are open-backed, you can rinse them with distilled water. For foil-backed rhinestones, avoid rinsing and instead use a damp cloth to wipe away any residue.
Dry: Pat the jewelry dry with a lint-free cloth and then let it air dry completely.
3. Ultrasonic Cleaning (For Sturdy Pieces Only)
Fill the Cleaner: Fill your ultrasonic cleaner with a solution recommended by the manufacturer.
Place the Jewelry: Put your rhinestone jewelry in the cleaner's basket, ensuring the pieces don't touch each other.
Run the Cleaner: Turn on the cleaner and run it for the duration specified in the manual.
Remove and Dry: Once the cycle is complete, remove the jewelry and pat it dry with a lint-free cloth.
4. Polishing
Use a Cloth: Once your jewelry is clean and dry, use a soft cloth to gently polish the rhinestones and any metal parts.
Avoid Chemical Polishes: These can damage the rhinestones. Stick to a simple cloth polishing method.
5. Inspect and Store
Final Inspection: After cleaning, inspect your jewelry again to make sure all stones are intact and secure.
Storage: Store your rhinestone jewelry separately in soft pouches to prevent scratches and damage.
Common Mistakes to Avoid When Cleaning Rhinestone Jewelry
Even small mistakes can have big consequences when it comes to cleaning rhinestone jewelry. Here's what to steer clear of:
Using Harsh Chemicals
Harsh chemicals can damage the foil backing of the rhinestones. Always use mild cleaning agents.
Over-cleaning
Cleaning too often is unnecessary and can lead to wear and tear. A monthly cleaning routine is enough for most rhinestone jewelry.
Frequently Asked Questions
Can I clean rhinestone jewelry with vinegar?
Vinegar is too acidic for rhinestones and can damage the foil backing. Stick to mild detergents or specialized cleaners.
How often should I clean my rhinestone jewelry?
Cleaning your rhinestone jewelry once a month is usually enough to keep it sparkling.
Is it safe to use a jewelry cleaner machine?
For modern, sturdy pieces, a jewelry cleaner machine is generally safe. However, it's not recommended for vintage or delicate items.
Final Thoughts
When it comes to how to clean rhinestone jewelry and ensure its longevity, the quality of the rhinestones matters immensely. Planet Rhinestone stands out as a premier destination for top-tier rhinestone products.
Our curated selection caters to both individual enthusiasts and professional crafters. Whether you're looking to rejuvenate a cherished piece with a fresh gem or start a new crafting endeavor, our offerings ensure you're equipped with the best.

What is a Rhinestone? The Ultimate Guide
Rhinestones are insanely popular, but what is a rhinestone? Rhinestones are multifaceted gems that have been used for centuries to emulate the brilliance of diamonds. Their versatility and affordability have made them a popular choice in various industries, from fashion to arts and crafts.
In this guide, we explore the essence of rhinestones, their origins, and their importance in today's world.
What is a Rhinestone?
A rhinestone, often referred to as an "imitation diamond," is a gem made from materials such as rock crystal, glass, or acrylic. Unlike diamonds, which are naturally occurring and formed under immense pressure over millions of years, rhinestones are man-made.
They’re crafted to capture and refract light like diamonds, giving them their characteristic sparkle and high luster. Over the years, rhinestones have become a popular and cost-effective alternative to diamonds in jewelry, fashion, and various decorative applications.
The Origin of Rhinestones
Rhinestones have a rich history that traces back centuries, with their name and initial discovery deeply rooted in European geography and culture. Their evolution over time has been influenced by technological advancements, fashion trends, and global trade.
Historical Background
The term "rhinestone" originates from the Rhine River, which flows throughout Europe. In the early days, naturally occurring rock crystals were collected from the river's banks. These crystals, resembling diamonds in their raw form, were originally the only source of rhinestones. As their popularity grew, they became coveted items, often used as substitutes for real diamonds by those who couldn't afford the genuine gemstone.
Evolution Over Time
The natural rock crystals from the Rhine River were limited in supply, prompting innovators to seek alternative methods to produce these shiny embellishments. By the 18th century, with the advent of glassmaking techniques, artisans began producing leaded glass rhinestones, which offered a similar sparkle to the natural crystals.
This shift to manufactured rhinestones made them more accessible and paved the way for their widespread use in jewelry, apparel, and art.
Notable Events in Rhinestone History
One of the most significant milestones in rhinestone history was the invention of a precision-cutting machine by Daniel Swarovski in 1892. This machine allowed for more accurate and consistent cuts, resulting in rhinestones that sparkled like never before. Swarovski's innovation elevated the status of rhinestones, making them even more indistinguishable from real diamonds in appearance.
What is a Rhinestone Made Of?
Rhinestones can be crafted from a range of materials, each offering distinct characteristics:
Glass: A common material for rhinestones, glass can be molded and treated to achieve a diamond-like sparkle. Modern glass rhinestones often undergo treatments to enhance their reflective properties.
Acrylic: A lightweight and cost-effective alternative, acrylic rhinestones are less brilliant than their glass or crystal counterparts but are favored for applications where weight or cost is a concern.
Crystal: Typically made from leaded glass, crystal rhinestones are prized for their exceptional brilliance and clarity. The lead content increases the refractive index, giving them a sparkle that closely mimics that of genuine diamonds.
Rhinestone Manufacturing Process
The creation of a rhinestone involves several steps:
Cutting: The chosen material is cut into small, gem-like shapes. Precision is key to ensuring each facet reflects light optimally.
Polishing: After cutting, the rhinestones are polished to remove any imperfections and enhance their shine.
Coating: Some rhinestones receive a special coating to increase their reflectiveness or to add color.
Types of Rhinestones
Rhinestones, though seemingly simple, come in a variety of types tailored for specific applications.
Glass Rhinestones
Glass rhinestones, with their balance of affordability and brilliance, are a staple in the fashion industry. They're often treated with special coatings to mimic the colors and sparkle of genuine gemstones.
Acrylic Rhinestones
Ideal for applications where weight is a concern, acrylic rhinestones are often found in theatrical costumes or large-scale craft projects. Their lighter weight makes them comfortable for wearers and easier to work with in crafts.
Crystal Rhinestones
The luxury choice, crystal rhinestones, commonly created with a leaded glass composition, are sought after for their unparalleled brilliance. They're a favorite for high-end jewelry and fashion pieces.
Specialized Rhinestones
There are two main types of specialized rhinestones:
Hot Fix Rhinestones
Designed for ease of application, hot fix rhinestones come with a heat-activated adhesive on the back. When heat is applied, the adhesive melts, allowing the rhinestone to bond securely to fabrics.
Flat Back Rhinestones
These rhinestones are designed for versatility. With a flat back, they can be adhered to a variety of surfaces, from phone cases to jewelry, using standard craft glue or paste.
Sizing Guide for Rhinestones
Rhinestones are categorized by "ss" or stone size, a standard measurement that indicates diameter. For example, an 8ss rhinestone has a diameter of 2.3 mm.
To learn more about rhinestone sizing, check our Rhinestone Sizes guide.
Common Uses of Rhinestones
Rhinestones, with their versatile nature, have found their way into a wide range of applications.
Apparel and Fashion
Rhinestones have long been associated with the world of fashion. From accentuating haute couture gowns to adding sparkle to nail designs, they've become an integral part of fashion design. Designers often use rhinestones to elevate a piece, making it stand out on the runway or in retail stores.
Home Décor
Beyond clothing, rhinestones have made a mark in interior design. They're often used to embellish furnishings, from cushion covers to curtain tie-backs, adding a luxurious touch. In more opulent settings, rhinestones might even be incorporated into chandeliers or wall art, reflecting light and adding a touch of grandeur.
Crafts and DIY Projects
For craft enthusiasts, rhinestones are a treasure. They're used to decorate handmade jewelry, greeting cards, scrapbooks, and more. Their ease of application and the instant glamour they provide make them a popular choice for DIY projects of all scales.
Where to Buy Rhinestones
With the rising popularity of rhinestones, there are numerous avenues to purchase them, each catering to different needs and preferences.
Online Stores
Online platforms, such as Planet Rhinestone, offer a vast selection of rhinestones in various sizes, colors, and types. Shopping online provides the convenience of comparing options, reading reviews, and often accessing better deals. However, it's essential to buy from reputable sellers to ensure quality.
Physical Stores
Craft stores, fashion accessory shops, and specialty boutiques often carry a selection of rhinestones. Shopping in person allows buyers to assess the quality, size, and color firsthand, ensuring they get precisely what they're looking for.
Wholesale Suppliers
For those looking to buy in bulk, perhaps for a large project or business, wholesale suppliers offer rhinestones at discounted rates. This option is ideal for fashion designers, event planners, or craft business owners.
How to Identify Quality Rhinestones
Here are the things you should consider to make sure you’re getting the best rhinestones possible:
Cut and Facets
A well-cut rhinestone will have multiple facets, each precision-engineered to reflect light. The number and arrangement of these facets play a significant role in the stone's overall brilliance.
Color and Clarity
Consistency in color and a lack of cloudiness or inclusions are markers of a high-quality rhinestone.
Size and Shape
Uniformity in size and shape, especially when purchasing multiple rhinestones for a project, ensures a cohesive and professional-looking final product.
FAQs About Rhinestones
How do I differentiate between glass, acrylic, and crystal rhinestones?
Glass rhinestones have a weighty feel and offer a balance between brilliance and affordability. Acrylic rhinestones are lightweight and less brilliant than glass or crystal. Crystal rhinestones are the most brilliant, made from leaded glass.
Can rhinestones be safely washed on clothing?
Yes, rhinestones on clothing can be washed, but with care. It's best to turn the garment inside out and use a gentle washing cycle with cold water. Avoid using harsh detergents or bleach. For added protection, placing the garment in a mesh laundry bag can prevent snagging. Always air dry; avoid wringing the garment or using a tumble dryer, as the heat can loosen the adhesive holding the rhinestones.
Are rhinestones environmentally friendly?
The environmental impact of rhinestones depends on their composition and manufacturing process. Traditional leaded crystal rhinestones have environmental concerns due to lead content. However, many modern rhinestones are made lead-free.
Final Thoughts
If you're still wondering what a rhinestone is, think of it as a versatile, affordable way to add sparkle to your life. Their ability to mimic the brilliance of diamonds at a fraction of the cost has made them a sought-after commodity. Whether you're looking to add a touch of sparkle to your outfit, create a unique piece of art, or simply learn more about these fascinating gems, the world of rhinestones offers endless possibilities.
For those interested in exploring further, Planet Rhinestone provides a comprehensive range of options, ensuring every sparkle enthusiast finds their perfect match.
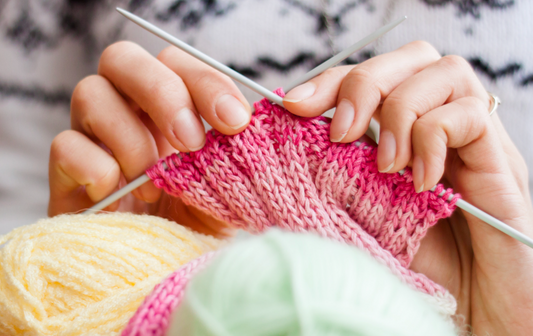
Crochet vs Knit: Differences and Similarities
Some people love crocheting, others prefer knitting. But which one’s right for you? We’ve put together a guide with everything you need to know about crochet vs knit styles, including their differences, similarities, and unique characteristics.
What is Crochet?
Crochet is a craft that involves creating fabric by interlocking loops of yarn, thread, or strands of other materials using a crochet hook. The word 'crochet' comes from the French term meaning 'small hook'.
Basic Crochet Techniques and Tools
The basic crochet techniques include the chain stitch, single crochet, double crochet, and slip stitch.
The primary tool used in crochet is the crochet hook, which comes in various sizes to match different yarn weights.
Benefits of Crocheting
Crocheting has many advantages, including:
It uses one active stitch, reducing the risk of dropped stitches.
It allows for more freedom in shaping the fabric, making it ideal for creating intricate patterns and three-dimensional items.
What is Knitting?
Knitting, like crochet, is a method of creating fabric from yarn. However, knitting involves creating fabric by interlocking loops of yarn using two or more knitting needles. The loops, or stitches, are held on the needles, forming a 'live' row.
Basic Knitting Techniques and Tools
The two fundamental knitting techniques are the knit stitch and the purl stitch.
The primary tools used in knitting are knitting needles, which come in various types, including straight, circular, and double-pointed needles.
Benefits of Knitting
Knitting also has plenty of benefits, including:
The fabric produced is lighter and more flexible than crocheted fabric, making it ideal for bodices, appliques and other garments.
Knitting allows for intricate colorwork patterns, such as Fair Isle and Intarsia.
Key Differences Between Crochet and Knit
Understanding the differences between crochet and knit can help you choose the right craft for your project.
Differences in Technique
While both crafts involve manipulating yarn to create fabric, the techniques used are different. Crochet uses one active stitch at a time and requires a single crochet hook. In contrast, knitting involves multiple active stitches and uses two or more knitting needles.
Differences in Tools and Materials
Crochet requires fewer tools than knitting. A crochet hook and yarn are the basic necessities. On the other hand, knitting requires at least two knitting needles, and certain projects require additional tools such as stitch markers and cable needles.
Differences in Texture and Appearance
Crocheted fabric is generally denser and sturdier, with a more textured appearance. Knitted fabric, on the other hand, is smoother and more flexible.
Key Similarities Between Crochet and Knit
Despite their differences, crochet and knit share several similarities.
Similarities in Technique
Both crafts require you to follow patterns, which are written instructions or charts that guide the creation of the fabric.
Similarities in Tools
Both crafts require a yarn and a tool to manipulate the yarn. Additionally, depending on your project, you can use other tools such as stitch markers, yarn needles, and scissors in both cases.
Similarities in Texture and Appearance
Both crochet and knit create a textured fabric that can be as simple or as intricate as you want. You can create flat pieces or three-dimensional items, incorporate colorwork, and textured stitch patterns with both crafts.
Choosing Between Crochet and Knit: Factors to Consider
When deciding between crochet and knit, there are a few things you should consider:
Think about your personal preferences.
Check the type of project you want to create. Some projects are better suited to the characteristics of crochet, while others can benefit from the properties of knitted fabric.
Consider the time and speed. Crochet is generally faster than knitting, but the speed can vary depending on the stitch and your skill level.
Keep in mind your skill level.
Crochet vs Knit: FAQs
Is Crochet or Knitting Easier for Beginners?
The answer to this question varies from person to person. Some find crochet easier because it involves only one active stitch at a time. Others find knitting easier because of its rhythmic, repetitive motion.
Which is Faster, Crochet or Knit?
Generally, crochet is faster than knitting, but the speed can depend on the stitch you use and your skill level.
Can You Combine Crochet and Knitting in One Project?
Yes, you can combine crochet and knitting in one project. This combination is known as 'knooking' and allows for a unique blend of textures and designs.
What Materials Can Be Used for Both Crochet and Knit?
Both crochet and knitting can use a wide range of materials, including wool, cotton, acrylic, silk, and more.
Final Verdict
In the debate of crochet vs knit, there's no clear winner. It's all about personal preference, the project at hand, and the joy you derive from the craft.
At Planet Rhinestone, we believe in the power of creativity and the beauty of handcrafted items. Just as you choose between crochet and knitting, you can also choose to embellish your creations with our wide range of rhinestones. Whether you're knitting a stylish sweater or crocheting a plush toy, our rhinestones can add a touch of sparkle and personality to your projects.
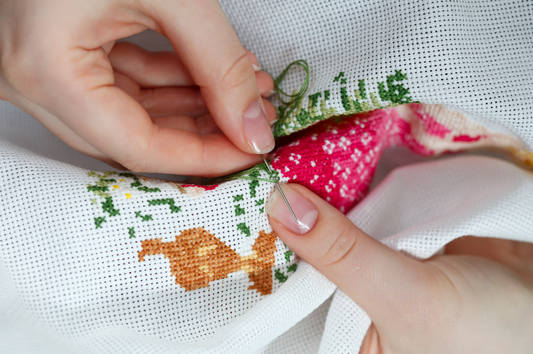
How to Cross Stitch: A Beginners Guide
If you want to learn how to cross stitch, we’ve got you covered. In this guide, we delve into the basics of cross stitching, including the materials you need, how to read a cross stitch pattern, and step-by-step instructions for creating your first cross stitch project.
Introduction to Cross Stitching
Cross stitching is a form of counted thread embroidery with a rich history. Let's first explore the essence of this craft:
What is Cross Stitching?
Cross stitching is an embroidery style that uses x-shaped stitches to create intricate designs on fabric.
Why Cross Stitching?
The charm of cross stitching lies in its simplicity. With just a needle, thread, and fabric, you transform basic materials into meaningful, personalized gifts. It's also a great stress reliever.
Getting Started with Cross Stitching
Embarking on your cross stitching journey involves understanding the tools of the trade and how to use them effectively. From choosing the right materials to preparing your fabric, every step is key.
Cross Stitching Materials and Tools
Cross stitch fabric (Aida, Evenweave, Linen)
Embroidery floss
Cross stitch needles
Embroidery hoop
Scissors
Optional Supplies
Needle threader
Pattern or design
Marking tools
How to Start Cross Stitching
If you want to create a successful cross stitch project, you need to prepare properly. This involves understanding how to read a pattern and preparing your fabric and thread.
Reading a Cross Stitch Pattern
A cross stitch pattern is a grid of symbols, with each symbol representing a stitch of a specific color. Reading a pattern involves matching the symbols to their corresponding colors and stitching them onto your fabric.
You can find cross stitch pattern ideas online or create your own design using a cricut machine.
Preparing Your Fabric
Before you start stitching, you need to find the center of your fabric and pattern, which is typically where you start stitching. It's also important to prevent the edges of your fabric from fraying; just use a masking tape or sew a simple border.
Basic Cross Stitch Techniques
Once you've prepared your materials, it's time to start stitching. Below we cover the basic stitches used in cross stitching.
How to Make a Cross Stitch
The basic cross stitch is an X-shaped stitch that’s the foundation of your design. To make a cross stitch:
Bring the needle up through the fabric
Cross over to the opposite corner to form a half stitch
Complete the X by crossing over to the other corner.
How to Make a Half Cross Stitch
A half cross stitch is a diagonal stitch that’s typically used for backgrounds or to create a sense of depth in a design. To make a half cross stitch:
Bring the needle up through the fabric
Then, bring it down diagonally, just like the first half of a full cross stitch.
How to Make a Back Stitch Line
Back stitch lines are used to outline designs and add details. Unlike cross stitches, which form X's, back stitches are straight lines. To make a back stitch:
Bring the needle up a stitch length away from your starting point
Put the needle back down at your starting point, creating a single straight line.
How to Make a 3/4 Cross Stitch
A 3/4 cross stitch is a combination of a half cross stitch and a quarter stitch. It's used to add detail and contour to your design. To make a 3/4 cross stitch:
Start with a half cross stitch
Next, add a quarter stitch on top.
How to Make Two 3/4 Cross Stitches in One Cross Stitch
This technique is used to create a smoother transition between colors or to add detail. To do it:
Start by making a 3/4 cross stitch in one color
Then, complete the stitch with a 3/4 cross stitch in a different color.
Advanced Cross Stitching Techniques
Once you've mastered the basics, you can explore more advanced techniques. These can add depth and complexity to your designs.
How to Bury the Ends of Your Thread When Cross Stitching
Burying the ends of your thread helps to secure your stitches and keep the back of your work neat. To do this, run your needle and thread under several completed stitches on the back of your fabric before cutting the thread.
How to Introduce New Colors to Your Cross Stitch Project
Introducing new colors can bring your design to life. To do this, start a new thread in the same way you started your first, making sure to bury the end. Then, simply start stitching in your new color.
How to Finish a Cross Stitch Project
Once you've completed all the stitches, you need to secure your thread. Here’s how:
Bury the end of your thread under other stitches, just like when you introduce a new color.
Wash and iron your project to remove any oils from your hands and make your stitches look their best.
Troubleshooting Common Cross Stitch Problems
Here are some common cross stitching issues and their solutions to keep your stitching smooth and enjoyable:
Miscounted Stitches
Miscounted stitches can throw off your entire pattern. If you notice a mistake, it's best to correct it as soon as possible. Carefully remove the incorrect stitches using a seam ripper or a needle, then count again and restitch.
Tangled Thread
Tangled thread can cause knots and uneven stitches. To prevent this, try not to pull the thread too hard or too fast. Also, using shorter lengths of thread can help. If your thread get tangled, gently pull the knot along the thread towards the needle until it comes out.
Uneven Stitches
Uneven stitches can make your finished piece look messy. To keep your stitches even, make sure you're pulling the thread with the same amount of tension each time. Using an embroidery hoop can also help keep your fabric taut and your stitches even.
Tips and Tricks for Improving Your Cross Stitch
Here are some tips to help you improve your skills and enjoy the process more:
Try to keep your stitches all going in the same direction. This gives your finished piece a more uniform appearance.
Look for tutorials online to learn new stitches, techniques, and tips. The more you learn, the more you can bring your own unique style to your projects.
Choose the right fabric. Aida fabric is the most common choice for beginners, but if you're looking for a finer weave, try evenweave or linen.
Invest in good quality floss. Look for floss that’s colorfast and won't bleed or fade over time.
Take Your Cross Stich Project To The Next Level
As you continue to explore and master cross stitching, remember that each stitch is a step towards creating something truly unique. It's a journey of creativity, patience, and continuous learning.
At Planet Rhinestone we offer an extensive range of high-quality cross stitching materials and accessories to support your cross stitching journey. Whether you're a beginner looking to start your first project or an experienced stitcher seeking to expand your horizons, we can help you bring your cross stitch designs to life.
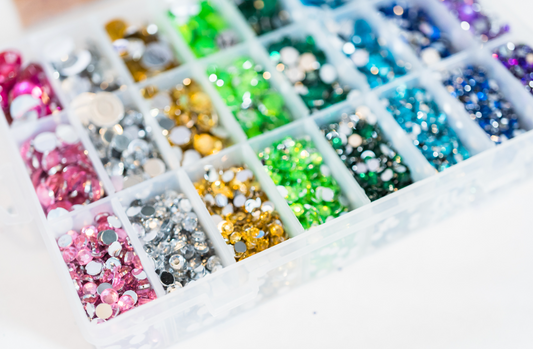
Rhinestone Sizes: Your Go-To Guide
Understanding rhinestone sizes helps you choose the right rhinestones for your project. Whether you're decorating a dress, a piece of jewelry, or a craft project, we’ve got you covered.
What are Rhinestones?
Rhinestones are imitation gemstones made from glass, acrylic, or crystal. They're used everywhere —from fashion and jewelry to nail art and crafts. They're sparkly, affordable, and come in all sorts of sizes, shapes, and colors.
History of Rhinestones
Rhinestones were originally rock crystals gathered from the Rhine River in Austria. In the 18th century, a French jeweler named Georges Frédéric Strass developed a method to make artificial gemstones by coating the lower side of glass with metal powder —hence the name "Strass stones".
The Importance of Rhinestone Sizes
Why Size Matters
The size of a rhinestone affects how much it sparkles and how your design turns out. Larger rhinestones reflect more light, making them more dazzling. Smaller rhinestones allow for more detailed and intricate designs.
Impact of Size on Rhinestone Value
The value of a rhinestone is about the quality of the material, how well it's cut, and how complex the color is. But larger high-quality rhinestones can be pricier because they need more material and work to make.
Standards for Measuring Rhinestone Sizes
Stone Size (ss)
Stone Size, or ss, is a standard unit of measure for rhinestones. It’s commonly used with flat back stones in the classic round shape. The ss measurement system starts at 1ss and goes up, with each increase in number indicating a larger size.
Pearl Plate (pp)
Pearl Plate, or pp, is another unit of measure typically used with pointed back stones in the classic round shape. Like ss, the pp measurement system starts at 1pp and increases with size.
Millimeter (mm)
The millimeter is a universal unit of measure used across a wide range of industries, including the rhinestone industry. It’s especially useful for measuring stone shapes other than the classic round.
Standard Rhinestone Sizes
Rhinestone Size Chart
Common Rhinestone Sizes and Their Uses
Rhinestone sizes range from tiny 1ss stones, which are less than 1mm in diameter, to large SS48 stones, which are about 11mm in diameter. Smaller stones are perfect for detailed work, like nail art designs, while bigger stones are great for making a bold statement.
How to Measure Rhinestone Sizes
Tools for Measuring Rhinestones
To measure rhinestones accurately, you need a tool like a digital caliper or a specialized rhinestone sizing tool, along with your rhinestone size chart. These tools allow you to measure the diameter of the rhinestone in millimeters, which you can then convert to ss or pp if needed.
Step-by-Step Guide to Measuring Rhinestones
First, place the rhinestone on a flat surface.
Then, using your measuring tool, measure the diameter of the rhinestone at its widest point. Make sure to measure from edge to edge, not just the raised part of the rhinestone.
Repeat the measurement a couple of times to ensure accuracy.
Choosing the Right Rhinestone Size
Factors to Consider When Choosing Rhinestone Size
When choosing a rhinestone size, consider the project you're working on. If you're embellishing a large area, you want to use larger rhinestones. For detailed work, smaller rhinestones are better.
Also, consider the style you're going for. Larger rhinestones are more flashy, while smaller rhinestones provide a subtle sparkle.
Best Rhinestone Sizes for Different Projects
For fashion accessories, SS16 to SS30s rhinestones are the standard. For nail art, smaller sizes like SS5 to SS10 are popular. For jewelry, the size of the rhinestones can vary depending on the design.
Understanding Jewel Sizes
How Jewel Sizes are Measured
Jewel sizes are measured in millimeters. Round jewels are measured by their diameter, square jewels are measured from point to point, and odd-shaped jewels are measured through a line in the center.
Jewel Size Comparison
To give you a better understanding of jewel sizes, here's a handy comparison: 25.5mm is approximately 1 inch, 18mm is about 3/4 inch, and 12.5mm is roughly 1/2 inch.
Pointed Back Rhinestones
Pointed back rhinestones, also known as chatons, are rhinestones with a pointed reverse side. This design allows them to reflect more light, making them even more sparkling.
Size Chart for Pointed Back Rhinestones
Pointed back rhinestones come in a wide range of sizes, starting from tiny PP sizes to larger SS sizes. A size chart can help you understand the different sizes available and choose the right ones for your project.
Frequently Asked Questions About Rhinestone Sizes
What is the smallest rhinestone size?
The smallest rhinestone size is typically SS1, which is less than 1mm in diameter. These tiny rhinestones are perfect for detailed work.
What is the largest rhinestone size?
The largest standard rhinestone size is SS50, which is about 11.7mm in diameter. However, custom sizes can be even larger.
How do I convert rhinestone sizes to millimeters?
You can convert rhinestone sizes to millimeters using a rhinestone size chart. These charts typically provide the diameter in millimeters for each ss or pp size.
Can I customize the size of my rhinestones?
Yes, some manufacturers offer custom rhinestone sizes. However, this is usually more expensive and may require a minimum order quantity.
Conclusion
At Planet Rhinestone, we understand the importance of choosing the right rhinestone sizes for your projects. That's why we offer a wide range of sizes, from tiny SS1 rhinestones perfect for detailed work, to large SS50 rhinestones that make a bold statement.
Our rhinestones are made from high-quality materials and are available in a variety of colors and shapes. Whether you're a professional designer or a DIY enthusiast, we're here to help you find the perfect rhinestones for your projects.

How to Use a Cricut: An In-Depth Guide
Have you ever found yourself wowed by intricate, personalized crafts and wondering how to make them? The secret might be a Cricut machine. Whether you're a crafting novice or a seasoned pro, knowing how to use a Cricut unlocks a world of creative possibilities.
In this guide, we demystify the Cricut machine. We break down everything from its basic components to the set up process. By the end of this article, you'll know how to use a Cricut like a pro.
We introduce you to the Cricut Design Space software, tell you about must-have accessories, and walk you through how to use it. We even share some tips and tricks.
What is a Cricut Machine?
A cricut machine is a cutting tool that crafters and DIYers use to make precision cuts. It's like a printer, but instead of ink, it uses a small blade to cut designs.
This electronic cutting machine can cut a wide variety of materials - paper, vinyl, cardstock, and even leather and wood. You create the design in Cricut's design software, then send it to the machine with Bluetooth or a USB.
There's three main types of Cricut machines: The Cricut Explore 3, the Cricut Maker 3, and the Cricut Joy.
The Cricut Explore 3 is a mid-level option and their best-selling machine, capable of cutting over 100 materials. The Cricut Maker 3 is a step up from the Explore 3. It can cut a wider variety of materials with more types of tools. The Cricut Joy is a small, portable model that's easy to set up and use. It's great for beginners.
But they're not just for cutting; they can write, score, deboss, engrave, and foil, depending on the model and tools used. They're super versatile for a bunch of craft projects. From custom t-shirts, greeting cards, stickers, to engraved leather, the Cricut does it all.
Why Use a Cricut?
Using a cricut machine opens up a world of possibilities for your crafting projects. They offer an insane level of precision, so crafters can create intricate and detailed designs that would be tough to do by hand. It's also perfect for personalizing gifts, home decor, and more.
They're also user-friendly, so they're accessible to crafters of all skill levels. The design software, Cricut Design Space, is intuitive and easy to navigate, even for beginners.
Understanding the Basics
To make the most out of your Cricut, there are a few things you should know:
Different Types of Cricut Machines
There are several types of cricut machines. For example:
Cricut Explore: This series is perfect for beginners because it strikes a great balance between features and affordability.
Cricut Maker: This is a great option if you're looking for more advanced cutting and scoring capabilities.
Cricut Joy: This is a compact machine that's perfect for quick and easy projects, like labels, cards, and decals.
Parts of a Cricut Machine
While user-friendly, a Cricut is a sophisticated piece of equipment made of several components. Each plays an important role in the machine's operation. Understanding their functions enhances your crafting experience. Here are the main parts of a Cricut machine:
Cutting Blade: The cutting blade is the heart of the Cricut machine. This cuts the material.
Accessory Clamp: The accessory clamp holds the blade in place during the cutting process.
Tool Cup: The tool cup is a storage space on the machine. It's for holding your extra blades, pens, and other small accessories.
Cutting Mat: The cutting mat holds your material in place while it's being cut. It's sticky on one side to keep your material from moving.
Roller and Feed Mechanism: These parts feed your material into the machine and keep it aligned during the cutting process.
Control Panel: This is where you'll find the buttons to load your mat, start or pause a cut, and adjust settings.
Material A Cricut Can Cut
One of the standout features of a Cricut is its ability to cut aso many different materials with precision. Here are some of the materials a Cricut machine can handle:
Paper and Cardstock: From delicate tissue paper to heavy-duty cardstock, a Cricut machine can handle various types of paper materials. They're perfect for making paper crafts, greeting cards, scrapbooks, and more.
Vinyl: Create decals, stickers, and custom t-shirt designs on vinyl. A Cricut machine can cut both adhesive and heat-transfer vinyl.
Iron-On Transfers: Create custom iron-on transfers for clothing, bags, and other fabric items.
Craft Foam: Make three-dimensional crafts, decorations, and children's projects with ease.
Felt and Fabric: With the right blade, a Cricut can cut felt and fabric. This is perfect for quilters and sewers, since it allows for precise cutting of patterns and shapes.
Leather: Some Cricut models, like the Cricut Maker, can cut leather. This opens up the ability to create custom jewelry, accessories, and home decor.
Balsa Wood: Again, with the right model and blade, a Cricut machine can cut thin balsa wood, so you can make intricate wooden crafts and decorations.
The exact materials a Cricut machine can cut depends on the model and blade you're using. Always check the specifications of your machine and blade before typing to cut a new material.
How To Use A Cricut Machine
The process starts in Cricut's Design Space software, where you create or choose a design.
Set Up Your Design in Cricut Design Space
In Cricut Design Space, you can create your design from scratch or import a pre-made design. If you want to create from scratch, the tool has plenty of edit options. You can add text in any font, insert shapes, or even draw freehand. After you're happy with your design, save it to your account.
Prepare The Material
Next, put your material onto the Cricut cutting mat. Keep the sticky side up so it can grip the material as it cuts. Then insert the loaded mat into the Cricut machine.
Cut The Design
Load your Cricut with the right blade and adjust the settings to match your material. Make sure your machine is set to the correct material setting. Then, press the "Cut" button in Design Space and watch as the Cricut machine brings your design to life.
After the cutting process, unload the mat from the machine and carefully remove the cut material. Depending on the project, you may need to assemble or apply your cut pieces to complete your craft.
And there you have it! You've made your very own product using a Cricut. Easy, right?
Setting Up Your Cricut Machine
Setting up your Cricut machine is pretty simple, but it's important to follow instructions and make sure everything is working properly. Here's a quick guide to get you started:
Connecting Your Cricut Machine to Your PC/MAC/iPad
To connect a Cricut machine to your device, install the Cricut Design Space software. Once installed, connect your machine using a USB cable or via Bluetooth.
Installing and Using Cricut Design Space
Cricut Design Space is the software used to create your designs, whether you want to make bodices, appliques templates, or anything else.
It's user-friendly and offers a wide range of features, including the ability to import your designs, use Cricut's library of images and fonts, and even draw your designs.
Must-Have Cricut Accessories
There are plenty of accessories that enhance your Cricut experience. These include different types of blades for cutting different materials, scoring styluses for creating fold lines, and pens for adding drawn details to your projects.
Understanding and Using Cricut Mats
Cricut mats come in different types, each designed for a specific material. For example, the LightGrip mat is perfect for lightweight materials like paper, while the StrongGrip mat is designed for heavy materials like leather.
Cricut Tools Craft Basic Set
The Cricut Tools Craft Basic Set is a collection of tools that will make your crafting projects easier. It includes a spatula, weeder, scraper, scissors, and tweezers.
Tips and Tricks for Using Your Cricut Machine
Always make sure your blade is sharp and clean for the best cutting results. Also, remember to replace your cutting mat regularly to ensure it stays sticky and holds your materials securely.
A few other things to keep in mind:
Check your blade before starting your project. A dull blade causes tearing or uneven cuts.
Keep your machine clean. Use a soft, dry cloth to wipe down your machine after each use. This prevents any debris or dust from getting inside the machine and affecting its performance.
Don't forget to adjust the pressure settings on your cricut machine if you're working with thicker or denser materials to help you achieve the best results.
Cricut Project Ideas and Tutorials
These are some great Cricut project ideas and tutorial resources to inspire your creativity:
Cricut Explore Air Beginner Projects
If you're new to using a Cricut machine, start with the Cricut Air On this machine, you can easily make personalized greeting cards, custom t-shirts, and home decor items.
Cricut Explore Air 2 Beginner Projects
The Cricut Explore Air 2 offers more advanced features, but there are still plenty of beginner-friendly projects you can try. These include making vinyl decals, custom stickers, and paper crafts.
Cricut Joy Beginner Projects
The Cricut Joy is a compact machine that's perfect for quick and easy projects. You can use it to make custom labels, greeting cards, and even wall decals.
Cricut Maker Projects (intermediate-level)
If you're ready to take your crafting to the next level, the Cricut Maker offers a range of intermediate-level projects. These include making rhinestone earrings, fabric dolls, and intricate paper flowers.
Cricut FAQs
Can you use the Explore Air 2 without Bluetooth?
Yes, you can use the Explore Air 2 without Bluetooth by connecting it to your device with a USB cable.
What is a Cricut mat? Is it like transfer tape?
A Cricut mat is a sticky mat that holds your materials in place while they're being cut. It's not the same as transfer tape, which is used to transfer vinyl designs from their backing paper to your project.
Which Cricut machine should I consider if I’m just getting started?
The Cricut Explore series is a great choice for beginners. It's user-friendly and offers a range of features that are perfect for getting started with crafting.
Conclusion
At Planet Rhinestone, we're passionate about crafting and helping others discover the joy of creating. We believe that anyone can learn how to use a Cricut, and we're here to guide you every step of the way.
Whether you're making your first cut or your hundredth, we're here to support you on your crafting journey. Remember, the key to successful crafting is practice, so don't be afraid to experiment and try new things. Happy crafting!
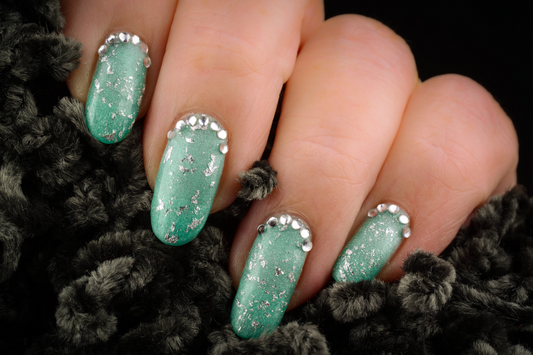
How To Put On Nails With Rhinestones
Adding rhinestones to your nail art is an easy way to take it from ordinary to extraordinary. But how do you get started?
Tips for adding rhinestones to nails
Using rhinestones in your nail art is a great way to add a touch of glamour and sparkle. With these easy tricks, you can have beautiful sparkling nails in no time. Grab your nail art supplies, get creative, and unleash your inner artist!
Prepare your nails
First, make sure your nails are clean and prepped for the rhinestones. Use a nail file and buffer to shape the nails and remove any ridges or imperfections. You may also want to use a base coat to make sure the rhinestones last.
Choose the right type of rhinestones
Rhinestones come in a variety of shapes, sizes and colors, so take some time to decide which type will best fit your nail art design. For a subtle look, try using small, clear rhinestones. For something more eye-catching, opt for larger, multi-colored stones.
Think about the placement
Take your time when you’re arranging the stones on your nails. If you’d like, use a template or stencil to help you create a symmetrical design.
Go light on the glitter
Glitter is a great way to add a bit of sparkle to your nails. However, when used in combination with rhinestones, it can be overpowering. Try to use glitter sparingly, perhaps only to accentuate the stones.
Use the right tools
A good set of tweezers or a rhinestone pickup tool can go a long way in creating the perfect rhinestone look. You may also want to have some nail glue and nail polish remover on hand, just in case.
Practice, practice, practice
Like any art form, the best way to get better is to practice. Experiment with different shapes and sizes of stones, and try out different placements and designs.
What about gems, pearls, and studs?
Rhinestones aren't the only nail art supplies that can add a touch of sparkle to your manicure. Gems, pearls, and studs can also be used to great effect. Just be sure to use some nail glue to secure them in place!
Steps for applying rhinestones to nails
Once you’ve got the perfect design, it’s time to start applying the rhinestones.
Paint on the adhesive
Use a small brush or the tip of a toothpick to paint on the adhesive onto the area where you want the rhinestones to go. For larger stones, you may need to use a thicker layer of adhesive.
Place the rhinestones
Next, use the tweezers to carefully pick up the stones and place them onto the adhesive. Press them down firmly so they stick.
Cure your rhinestones
Once all the stones are in place, it’s time to cure them. Place them under a UV light or LED lamp for a few minutes to make sure the adhesive and stones are secure
Finish with a top coat
Once all of the stones are in place, apply a thin layer of top coat to seal the design and make sure the rhinestones stay in place. This will also help to keep the rhinestones looking bright and shiny. Wait until the top coat is completely dry before you go outside or touch anything else.
Styles to Explore
Funky French Edges
Choose a contrasting color for the tips and use different sizes and colors of rhinestones to make it extra interesting.
Geometric Nail Art
Create some stunning geometric shapes using different colors and sizes of rhinestones. This look can be as subtle or as wild as you like.
Femenine Pink and Cream
For a soft and feminine look, pair pink and cream with some small clear rhinestones. This look works best with short to medium length nails and is perfect for special occasions.
Lacy Wedding Nails
Going to a formal, elegant event? Go for a lacy design using white and silver rhinestones.
Perfect for brides and bridesmaids, this will be sure to turn heads!
Mint Ice Cream
Create a cool and creamy look with mint and white rhinestones. This look is perfect for summer.
Bright ‘N Bold Coral
For a bold statement, try bright coral and pink rhinestones. This style is perfect for a night out and can be dressed up or down.
Remember to take care of those rhinestones!
Once your nails are complete, make sure to use a fast-drying top coat to protect them from chipping and fading.Take the time to remove the stones properly when you’re ready to switch up your nail art design.
Protect them
No matter what type of nail art look you’re going for, it's important to protect your rhinestones with a long-lasting top coat. Make sure to use a top coat that is specifically made for use with rhinestones. This will help them stick and last even longer.
How to properly place your stones
To get the most out of your rhinestone application, try to always properly place your stones. This includes using the right amount of adhesive, laying out stones in the desired order, and pressing down firmly on each one so they stick. Tweezers can also be a great tool when placing stones as they allow you to work with precision.
Clean up your nail bed
When you’re done with your rhinestone design, take the time to clean up your nail bed. Use nail polish remover and a cotton swab to gently remove any excess adhesive. This makes sure that your design looks professional and tidy.
Ready to make your nails sparkle and shine?
Rhinestones are a great way to give your nails a bit of glamour and sparkle. Just remember to be creative and have fun! Planet Rhinestone has everything you need for those perfect, sparkling nails, from flashy stones to gems to a rhinestone pickup tool you can depend on.
Subtle and classic designs look great, as do wild and colorful creations. Get creative, and put your own unique twist on the rhinestone nail art trend!
Best Ideas For Simple Rhinestone Nail Designs
There's no end to the possibilities of spicing up your manicure! There’s decals, stencils, stamps —the list goes on. The problem is, most of these nail designs are old, too complex, or just boring.
That’s where rhinestones come in. Whether you want to glam up your everyday style or wear them for a special occasion, rhinestones are one of the best ways to take your nail game to the next level. They’re versatile, unique, and simple to apply.
The best part is you can use them in many different ways; from adding them as accents on your nails to making them the centerpiece of your design. To help you get started with this trend, we’ve rounded up some of our favorite simple rhinestone nail designs.
11 Ideas for Simple Rhinestone Nail Designs
1. French Manicure With Rhinestones
While we can't deny the charm of a classic French manicure, sometimes it's fun to mix things up. Adding rhinestones to your french manicure is a great way to make them pop and stand out without going overboard. You can add them anywhere on your nail —at the base of each nail tip or just on one or two nails if you prefer.
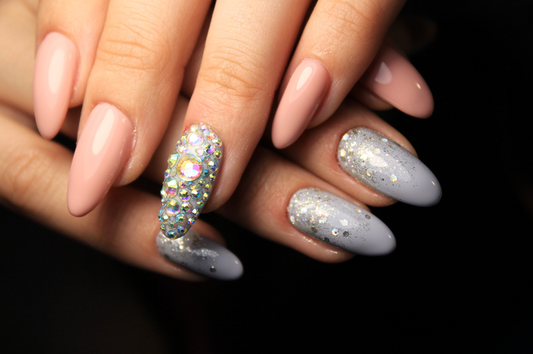
2. Sparkle Glam Matte Nails
This nail design is the perfect way to add some glitz and glamour to your nails. The rhinestones over the matte base make this look really stand out while keeping it subtle enough that it doesn’t overpower everything else going on with your look.
You can use any color you want for your base, but make sure it complements the rhinestones! You can also play with different sizes of rhinestones, depending on how much bling you want.
3. Stiletto Nails
The classic stiletto nail design, which is characterized by long, thin nails and a pointed tip, is great for showing off rhinestones. The sharp point of the stiletto-style nail allows for easy application of rhinestones and a clean line around the nails, while the length and width make it possible to create designs that are both intricate and colorful.
You can add a single rhinestone in the center of each nail makes for an elegant look, or use a variety of small rhinestones in different colors to create a fun pattern.
4. Glitter Coffin Nails With Rhinestones
This is a simple rhinestone nail design that looks good on any occasion. Coffin nails are essentially just long, straight nails with a very little curve. They look like a coffin that comes up to your fingertip. These can be classy and sophisticated, or edgy and punk —it's up to you!
You can paint them with any shade of glitter, and apply rhinestones on top to enhance their sparkle and add a unique dimension to the design.
5. Ombre Rhinestones Nails
Another fun way to incorporate rhinestones into your manicure is by using an ombre effect where the colors gradually blend together from the lightest at the top (e.g, white) down through darker shades until reaching black at the bottom (or vice versa).
Once you’ve decided on the range of colors you want, you can try adding rhinestones to give your nails an extra touch of shine. You can put them right where both colors blend, on top of one of the two shades, or add them as a border around the entire nail.
6. Bold Rhinestone Nails
If you've painted your nails with a bold color, such as red or electric blue, you can add just a touch of elegance by using rhinestones as a top coat. Instead of only picking out black or gray rhinestones, consider using blue, purple, or silver rhinestones to balance out the design and tone down the red or blue shade of your nail polish.
7. Flowers With Rhinestone Design
From subtle floral accents to colorful blooms and intricate acrylic details, acrylic flowers design can add a burst of personality to your manicure. In order to make your flowers more vibrant and attractive, use rhinestones. Some nail design professionals even use rhinestones to create flowers and leaves that are more realistic looking than other methods like airbrushing or stamping.
8. Swarovski Rhinestone Design
If you've got a special occasion coming up, a Swarovski rhinestone design is the perfect way to make your outfit pop. These rhinestones are made of Swarovski crystals —the same crystals used in high-end jewelry and accessories— so they're not only gorgeous but also incredibly durable. You can wear these nails wherever you go and they'll hold up just fine.
They also come in an array of colors and sizes and can be used as accents or even full-on nail art designs.
9. Rhinestone Acrylic Nail Design
This nail design uses rhinestones on an acrylic base coat, which gives it a more natural shine as compared to other types of nail art. Most people use a soft-color base for all the nails and cover at least one with rhinestones. You can also add them around the edges, or place just one in the middle.
Just remember: when choosing your rhinestone colors, try to stick with the same tone or lighter shades so everything looks cohesive when put together!
10. Discreet Nail Design
A lot of people are afraid to wear rhinestones because they think they may look too flashy or the design may be over-the-top. However, it’s totally possible to go for an understated nail design with rhinestones.
For example, you can try pastel base colors like pale pink or lavender and add a couple of rhinestones on the tips of your nails for a classy touch. You can also choose only one nail and cover it with a small half-moon shape with a larger rhinestone in the center —this adds some bling without going overboard!
11. Butterfly Effect Design
This is one of the most popular designs for rhinestone nail art. It consists of a lot of rhinestones scattered around your nails in a pattern that looks like butterfly wings. The design can be done on any number of fingers, but it often looks best when used as an accent on one or two nails.
You can use a series of different colors in a contrasting palette to create a look that’s both fun and sophisticated, and it's also really easy to DIY!
Final Thoughts
From French manicures to Swarovski crystal designs, these ideas will add a touch of elegance and personality to your nails. With rhinestones, the possibilities are endless, and the best part is that they're easy to apply. Don't be afraid to mix things up and try different colors and sizes of rhinestones. Whether you're going for a bold or subtle look, rhinestones are a versatile and unique way to spice up your nail game.